Monday 30 April 2018

5 Common Portfolio Mistakes and How to Fix Them

Your portfolio is often a company or client’s first impression of you. Yet while we would dress up and prepare our talking points for an interview, we tend to neglect our portfolio or follow design trends that don’t represent us well.

In my work with Semplice, a portfolio system for designers, I’ve seen hundreds of design portfolios over the years. And I continue to see common trends that could be holding designers back from their dream jobs. Below are five simple portfolio mistakes that can easily be fixed and make big difference in the work you do in the future.

1. All Photos, No Case Studies

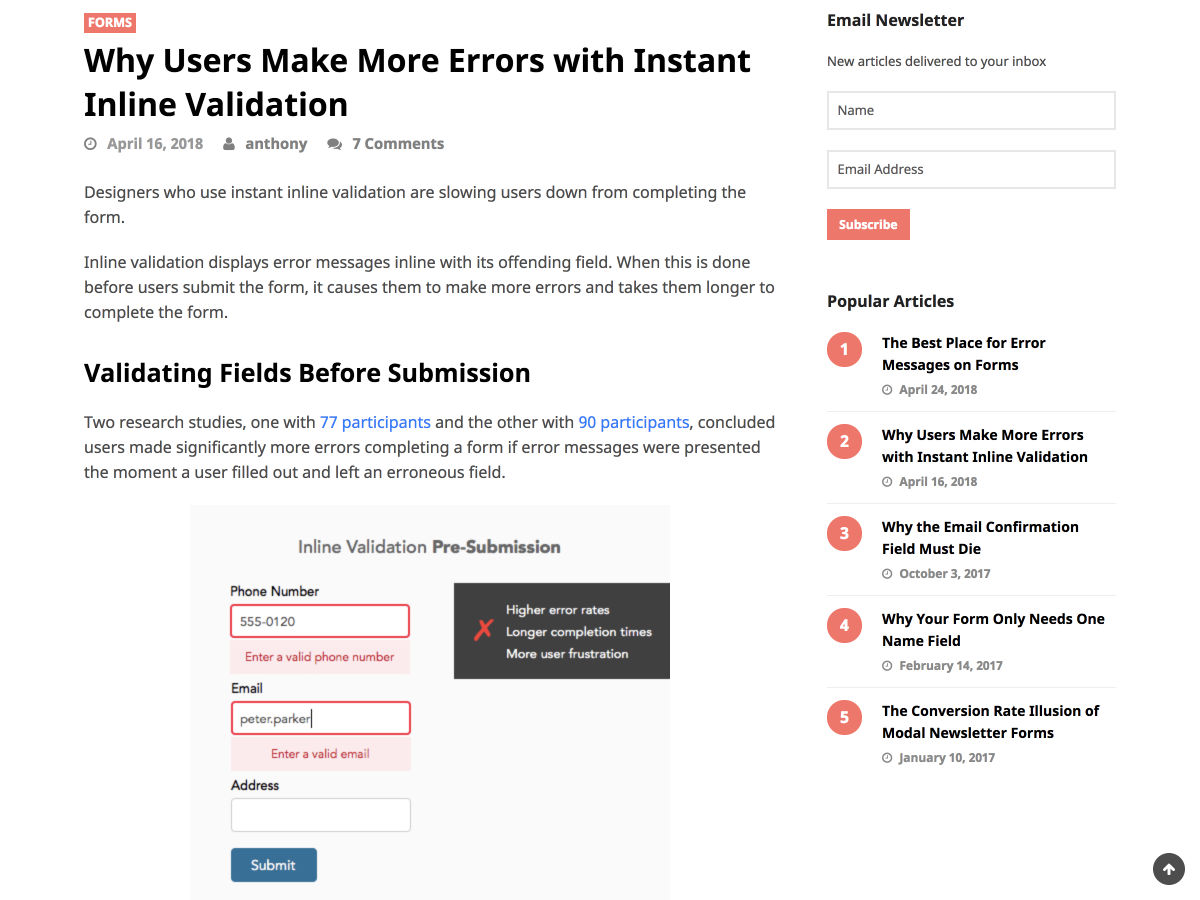
As designers, we naturally focus on the visual aspect of our portfolios. After all, the point of our portfolio is to showcase our designs. But in most cases (with the possible exception of things like playgrounds or mood boards), your readers need, and want context for your work. Don’t just dump a bunch of photos on the page and leave it up to us to decipher what they mean. Write case studies for every project that walks us through your approach, from challenge to solution.

How to Do it Right

Writing case studies feels less daunting if you break your project down into phases. You can even start by writing longer captions and a headline to go alongside each image, as shown in Mackey Saturday’s portfolio below. That’s basically all you need, since people will be scanning your page to see what’s most interesting to them. Keep it simple and and straightforward (no buzzwords or insider language), and you’ll find it’s quite easy to write case studies that elevate your portfolio significantly. Get more tips for writing portfolio case studies right here.

Mackey Saturday writes his case studies in caption form for easy reading.

2. Trendy, Vague Introductions

If you’re going to lead with a personal introduction on your portfolio, write something that actually helps us understand who you are. I’ve said this before and I’ll keep saying it until I stop seeing portfolios with intros like “I move pixels.” Lines like this mean nothing to a recruiter or potential client who is browsing your website. This is your main audience, which is easy to forget when we’re just trying to make an awesome portfolio.

How to Do it Right

Anyone looking to potentially hire you wants to understand at a glance what you can do for them. Something like “I’m Jessica Jones, a brand designer and art director from NYC” will do just fine. Being clear is better than being clever – being clear and clever (like Marina Rachello’s intro below) is even better.

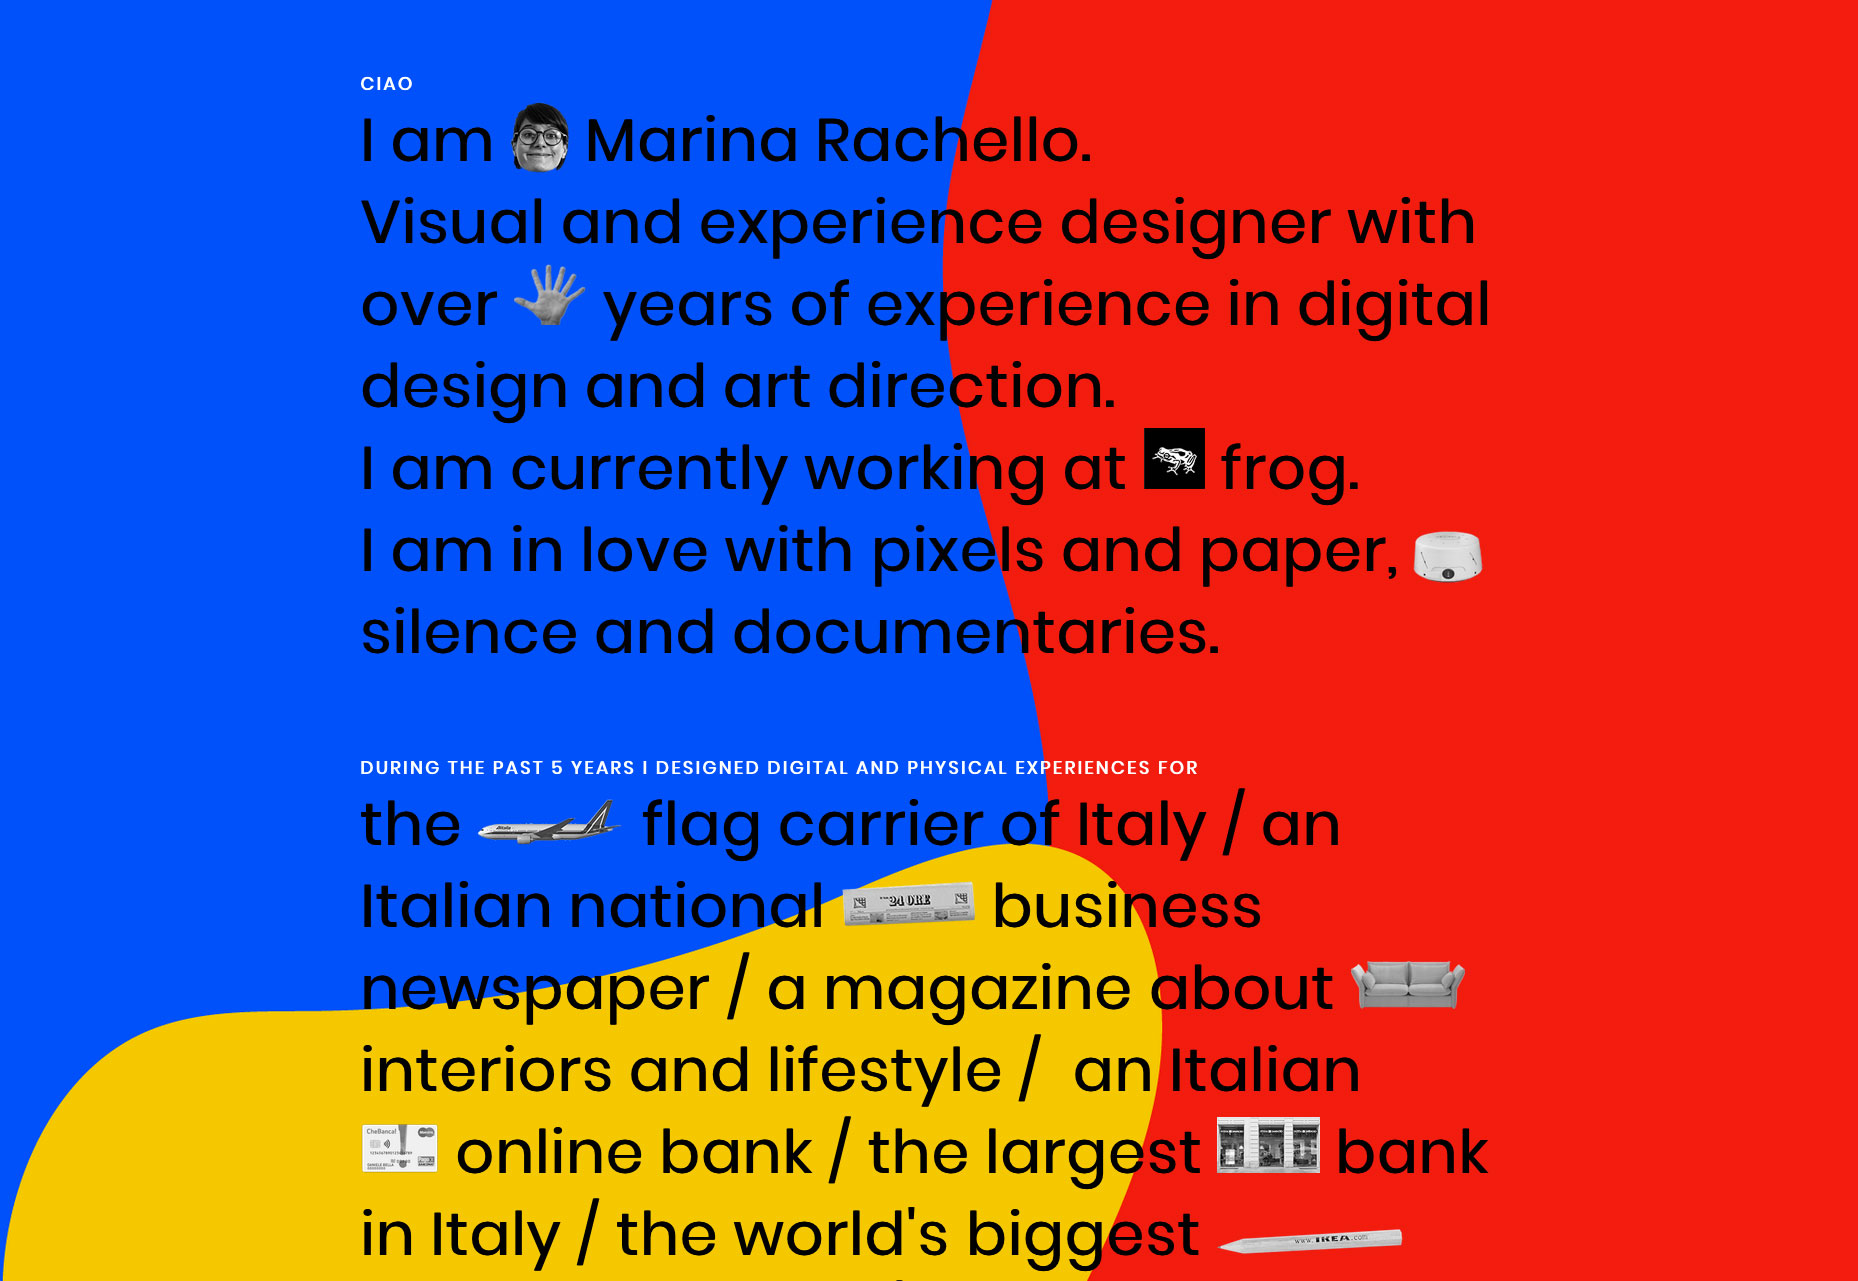
Marina Rachello’s intro is creative, yet simple and straightforward.

3. Outdated Projects and Design Style

I’m guilty of this myself: We get so busy doing the actual work, we forget our portfolio should always be current and evolve with us throughout our design career. But a dusty portfolio with outdated projects might actually be detrimental to your career. Even if you’re not sending it out to potential clients or employers, anyone can easily dig up your fossilized portfolio by simply searching your name online. That means you could be missing out on exciting work without even realizing it.

How to Do it Right

The good news is, it’s easy to keep your portfolio fresh and current. This is why I recommend against using a portfolio template, as they date quickly and will lock you into layouts that might be irrelevant later.

If you design your own portfolio, you can make light adjustments and updates consistently, allowing it to adapt to your career and modern design expectations without requiring a complete overhaul.

Verena Michelitsch’s portfolio, custom designed with Semplice.

4. Redundant Navigation and Dead Ends

When we’re working on a project for ourselves, we get so close to the work we forget best practices we know by heart. One common mistake is to creating a redundant or dead-end user flow, either confusing your visitor or leaving them with nothing to but exit the site when they’re done reading.

How to Do it Right

Remember to guide your reader through your portfolio, always pushing them closer toward your goals. Thankfully, your portfolio has two simple goals: Showcase your work and get people to contact you. Your navigation and project pages should of course reflect that.

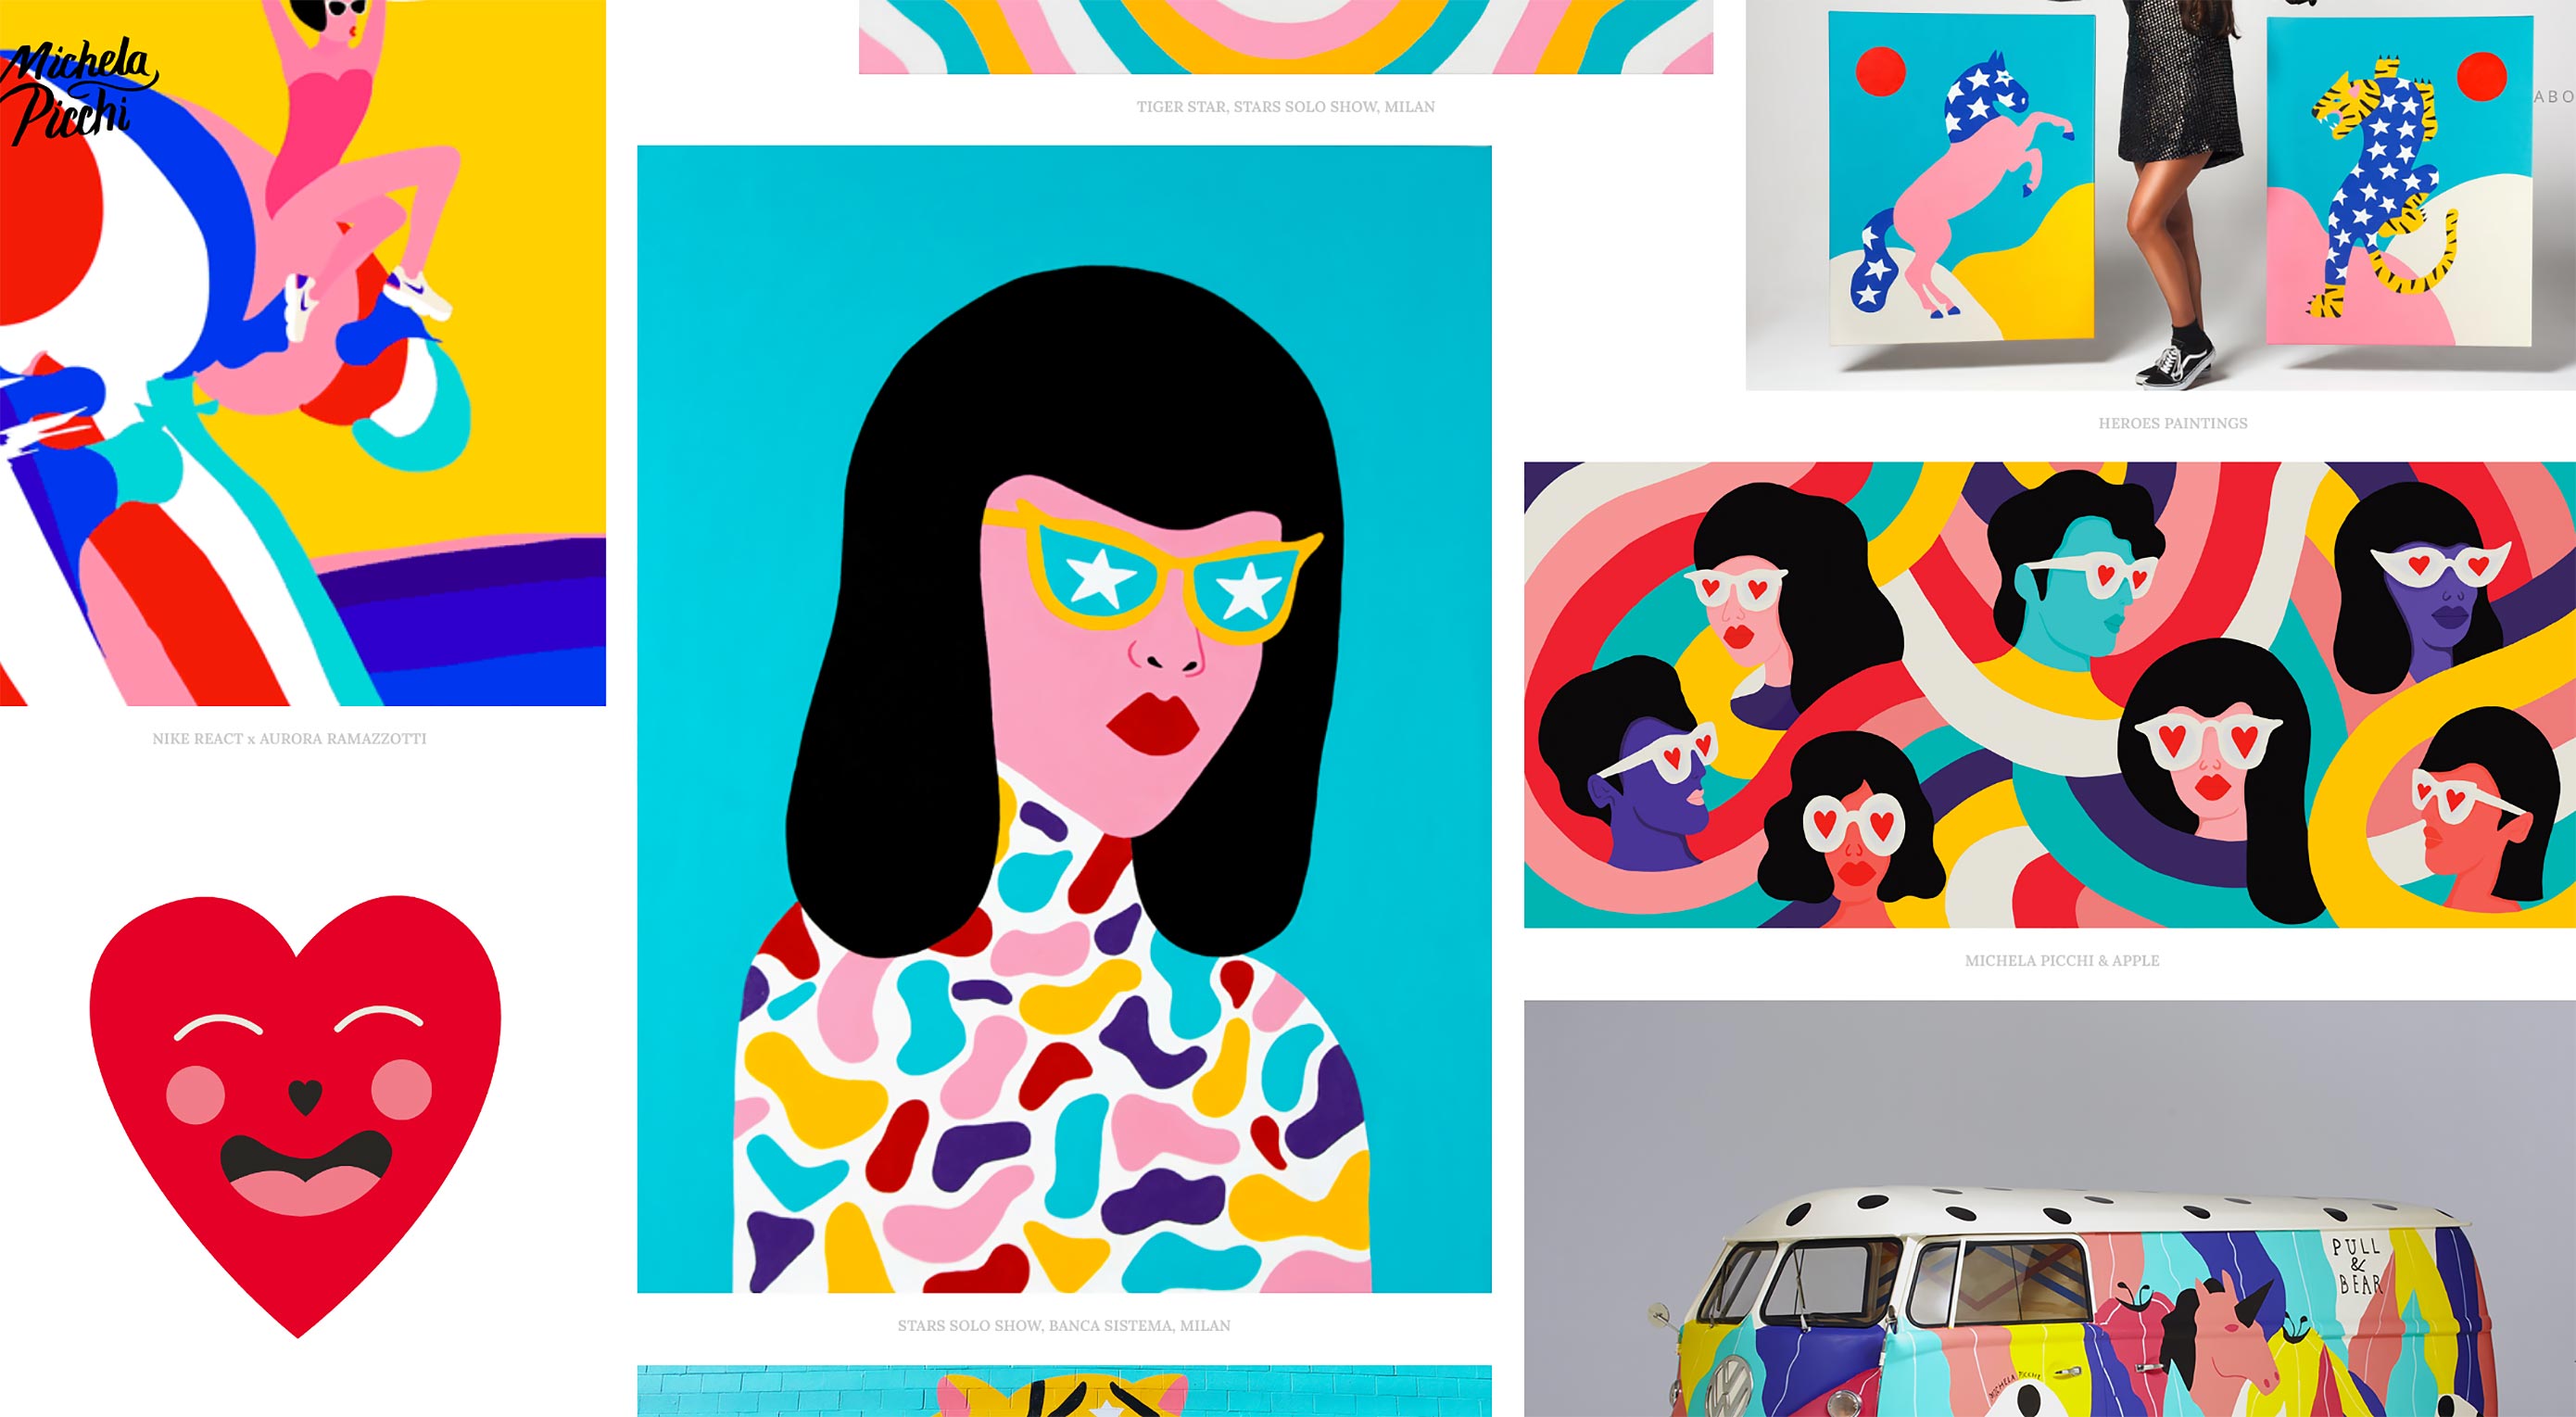
For example, you don’t need separate Contact and About pages. Cut out the extra steps and create an Info page with your bio and contact information. Add related projects with a preview at the bottom of your case studies, as shown in Michela Picchi’s portfolio below, so it’s easy to click between your work pages and keep reading.

Michela Picchi’s case studies end with an engaging “More Projects” section.

5. Boring About Pages

Your About page is an opportunity to make an impression and compel people to contact you. But sadly, most About pages I see aren’t very memorable or compelling.

How to Do it Right

Instead of just listing your creds and contact info, add some personality to your About page. Remember your reader has probably clicked through dozens of portfolios today. If you can make them smile, you’ll be remembered. Read more tips for making the perfect About page here.

Alina Skyson’s portfolio includes a visual and memorable “10 true facts about me” section.

Conclusion

Remember that your portfolio is not meant to be a grand work of art. While the design and details are important, your portfolio is ultimately meant to showcase your work — not stand in the way of it. When you keep your work and the person viewing it in mind, you’ll have a portfolio that sets you up for success.

Add Realistic Chalk and Sketch Lettering Effects with Sketch’it – only $5!

Source

from Webdesigner Depot https://www.webdesignerdepot.com/2018/04/5-common-portfolio-mistakes-and-how-to-fix-them/

Sunday 29 April 2018

Popular Design News of the Week: April 23, 2018 – April 29, 2018

Every week users submit a lot of interesting stuff on our sister site Webdesigner News, highlighting great content from around the web that can be of interest to web designers. 

The best way to keep track of all the great stories and news being posted is simply to check out the Webdesigner News site, however, in case you missed some here’s a quick and useful compilation of the most popular designer news that we curated from the past week.

Note that this is only a very small selection of the links that were posted, so don’t miss out and subscribe to our newsletter and follow the site daily for all the news.

What I Learned at Google as a Designer


Frontloops – Level up your Frontend Skills with Handcrafted Tasks


The New Gmail


Why Users Make More Errors with Instant Inline Validation


First Look at WordPress Gutenberg


TeaCode – App that Makes Writing Code Super Fast


Good Designer, Bad Designer


Scrumpy – A Simple, Beautiful and Agile Project Management Software


The Best Place for Error Messages on Forms


Tabindex


15 Best Multipurpose WordPress Themes to Use this Year


The Useless Web 2.0


Why I’m Leaving Medium


The Fast and Slow of Design


UX Job Titles: How to Set up your Job Title Name?


Ghost Buttons and Hollow Objects – Line Art is Thriving


Site Design: New Website for no Name


What Designers Need to Know About Perception


How to Develop an Eye for Design


Personal Branding Guide for Designers 2018


Common WordPress Mistakes to Avoid at all Costs


4 Ways to Optimize your Images for the Web and Improve your Site’s Performance


Terms and Conditions for Normal People


Fonts.lol: The First Color Font Provider is Online


The Most Important Company to Come Out of Silicon Valley, that no One’s Ever Heard of


Want more? No problem! Keep track of top design news from around the web with Webdesigner News.

Add Realistic Chalk and Sketch Lettering Effects with Sketch’it – only $5!

Source

from Webdesigner Depot https://www.webdesignerdepot.com/2018/04/popular-design-news-of-the-week-april-23-2018-april-29-2018/

Saturday 28 April 2018

Comics of the Week #433

Every week we feature a set of comics created exclusively for WDD.

The content revolves around web design, blogging and funny situations that we encounter in our daily lives as designers.

These great cartoons are created by Jerry King, an award-winning cartoonist who’s one of the most published, prolific and versatile cartoonists in the world today.

So for a few moments, take a break from your daily routine, have a laugh and enjoy these funny cartoons.

Feel free to leave your comments and suggestions below as well as any related stories of your own…

Good news

New but outdated


The fast designer

Can you relate to these situations? Please share your funny stories and comments below…

Add Realistic Chalk and Sketch Lettering Effects with Sketch’it – only $5!

Source

from Webdesigner Depot https://www.webdesignerdepot.com/2018/04/comics-of-the-week-433/

Friday 27 April 2018

Introducing Opera Touch, a Mobile Browser for Large Devices

If there’s one thing that we all have in common it’s having to use two hands to do anything on own phones. Am I right? Well, lucky for most of us, Opera has just released a new web browser for Android (sorry iPhone users) that makes it easier to operate interfaces with while one handed.

One of the worst things to try to do when only using one hand is typing. Specifically speaking, it is the worst when you have to move your thumb all the way up to the top and tap the URL box. All of this only for you to accidentally tap the screen on the way back down, restarting the process. Not anymore. Opera designed the browser so that as soon as it’s opened up, the URL box is highlighted and the keyboard is ready to go. No more of this four fingered balancing acts with our precious, priceless phones. That alone deserves a round of applause.

Don’t get up and leave just yet, it gets better. Opera has integrated what they call the “Fast Action Button”. This function allows you, at any time, to quickly swap to another site with the press of a button. Its design is pretty seamless in the fact that it literally only take one finger.

The button is located in the middle of the bottom of the screen. This, means that it’s out of the way, but not out of reach. At a moment’s notice, you can be bouncing back and forth between not just one or two, but multiple web browsers.

With the press of the button, you’ll open up a slide-wheel style menu that simply requires you to slide your finger to the desired site. No exiting browsers or clearing old tabs required.

Not only have Opera hit that nail right on the head, but they’ve driven it straight through the coffin of all other mobile browsers

Perhaps one of the coolest features that the browser has to offer is the ability to push websites from your phone to your computer. That’s not the end of it. As long as you’re also using Opera on your computer, you can send them right back to your phone. Some of this site swapping will happen automatically. When you’ve finished on your computer and have moved on to your phone, open a new tab and a “Continue from computer” option will pop up, allowing you to continue what you started. However, if you want to make sure everything is transferred properly, you can use the feature Opera is calling “Flow.”

Flow allows you to simply click on the icon and transfer the website, including the saved data to your phone or vice versa.

These are all extremely handy features. Opera is well known for ingenuity when it comes to mobile browsers, but this really takes the cake. This is exactly what Android mobile users have been looking for and it couldn’t have come any sooner. The reason people use their phones so often is for convenience sake. Not only have Opera hit that nail right on the head, but they’ve driven it straight through the coffin of all other mobile browsers.

Opera Touch is designed to do nothing but make our lives better with a feature rich browser that promises the easiest browsing in history. It’s easy to see exactly why this is such a big deal for anyone that uses their phone for not just work, but anything. It’s simple, straightforward, and easy to use for anyone. We all need a little simplicity in our lives, don’t we? Don’t just take my word for it, go and check out their features below and be sure to keep up with any updates they may have in the near future. What are you waiting for? You have a browser to download.

Add Realistic Chalk and Sketch Lettering Effects with Sketch’it – only $5!

Source

from Webdesigner Depot https://www.webdesignerdepot.com/2018/04/introducing-opera-touch-a-mobile-browser-for-large-devices/

Affinity Launches Spotlight

Communities don’t start overnight, and a customer base is not, by default, a community. When fans of any particular brand of software start talking, though, communities are bound to emerge. I have fond memories of a number of tutorial sites, you know?

Well Affinity, the company behind Affinity Designer and Affinity Photo, has apparently decided to try and jumpstart this process by launching Affinity Spotlight.

This new site does double duty as a learning resource for designers and photographers, and as an attempt to build a community around the Affinity brand. The site features tutorials, interviews, behind-the-scenes style articles, and articles geared toward plain old inspiration. It’s a bit like a cross between Tuts+, and Adobe’s own blog. Affinity Spotlight has a heavy focus on teaching the basics of its software to readers, but it also has a lot of content about the more conceptual aspects of creating art and design.

Since it is a fairly new site (having only just officially launched), there isn’t a ton of content just yet. They have content that goes back to December of last year, but the early stuff is basically all just news releases. Their learning-focused content is beginner-level for now, with titles like Blend modes explained, and Raw, actually (a title that I quite like).

Their inspirational and behind-the-scenes content, features some rather stunning work, by talented artists and designers. This, I think, can be enjoyed by creatives of any skill level, so if the beginner-level tutorials don’t appeal to you, you should go check that out.

Keep in mind that they are looking for contributors. If you have some experience with Affinity software, and creating learning materials, they’d likely be interested. If you have work that you think deserves to be featured on their site (preferably made with their software), they’re interested in that, too.

I’d say to give it a look. Even if you don’t use Affinity software, there’s a little something there that pretty much any creative could be inspired by, and there’s more coming…

Featured image is a detail from artwork by Dimitrios Sakkas, profiled on Affinity Spotlight.

Add Realistic Chalk and Sketch Lettering Effects with Sketch’it – only $5!

Source

from Webdesigner Depot https://www.webdesignerdepot.com/2018/04/affinity-launches-spotlight/

Thursday 26 April 2018

From Fireworks to Framer: Is Software Choice Good For Design?

It wasn’t all that long ago that web and product designers were presented with a choice: Fireworks, Illustrator, or Photoshop.

All owned by Adobe, they represented an industry that was dominated by one company. You either spent the large sum of money to buy the individual software or entire creative package, or used a lesser-known, less extensive (and expensive) software.

For a while, Adobe continued to innovate with this software, before beginning to rest on their laurels earlier this decade; it opened the door to new and inventive startups like Bohemian Coding—makers of Sketch—who very quickly began to gain a foothold on the web and product design industries. It drew users away from Adobe software at such a speed that they were forced to react. Similar new features were introduced to current software applications, as was a product design-specific software in the form of Adobe XD.

In more recent times we’ve seen the release of an incredible number of new product and web design tools: Figma, InVision, Framer, Gravit, Justinmind, Atomic, Alva, and Affinity Designer make for just a few of the companies to release competing design tools in the last few years.

the industry is now fragmented with designers all opting for different software and tools

The competitive element has pushed the product teams to innovate at never-before-seen levels. It’s led to some neat and impressive features around collaboration, prototyping, optimization, and workflows. Not only has it resulted in the end-products being better for the designer, it’s also lead to greater competition on pricing. Long gone are the days of paying hundreds of dollars up front for an Adobe software package. Many applications are now under $100, with others providing their software at a low monthly fee; others like Figma and Alva are entirely free to use for students and individuals.

With so much innovation and competition on pricing, it’s hard to believe there can be any downsides to this more competitive industry. But as in any industry, where a demand is formed and publicized, money and investment follows soon after. Typically this wouldn’t be a negative for the end user, however in the software industry there is more to consider.

Where once there was an industry standard software in Adobe (and later Sketch to some extent), the industry is now fragmented with designers all opting for different software and tools. It has formed an environment where there is great friction when collaborating, working with client files, and working in multiple teams.

Cross-platform compatibility of software—and often a lack thereof in the design industry—only compounds the issue further. No longer is it as simple as expecting a PSD at the end of a project, or syncing a Sketch file across a team. Instead there are so many options that there is no longer a standard format. SVG has its place but is far from usable as a format to share complex designs and prototypes, and collaborate across individuals and teams.

For the up and coming designers of the next generation, it’s making for a complicated scene of design software. There’s no longer a go-to option as there was with Photoshop and Sketch. While that often means there’s greater scope for finding one more specific to your needs and desires, it can otherwise be somewhat overwhelming and off-putting for beginners. It gets even more confusing when a number of software providers maintain different pricing models, operating system compatibilities, and seemingly similar feature sets.

For the freelance designer…the issue becomes magnified considerably

So where once we could suffice with one—possibly two—software applications, we now require multiple. For the freelance designer who is dropping in and out of teams and collaborating with new clients every week, the issue becomes magnified considerably.

To work this situation, they can now be expected to have access to most, if not all of this software and services. It becomes not only complex and overwhelming, but expensive too. It means having multiple applications open at once, resulting in a need for more capable and expensive Mac equipment. It means switching between tools you’re not a fan of, and having to learn new features at quite some pace. And the subscription and up-front costs can land a hefty bill on top of other expenses like business overheads and complementary tools like Marvel and Zeplin.

The situation looks to intensify over the coming years. More and more new applications are launching all the time, with many releasing in just the past six months. Some will come and go, while others will be adopted by a large enough proportion of designers to survive.

In a growing industry with more new designers trying their hand at design every year, there’s a place for most of these tools to survive and flourish. With that will come greater fragmentation and a negative impact on compatibility and collaboration. Teams will adapt and use a chosen software across the company. But freelancers and independent contractors will suffer the brunt of this development, and may eventually determine it as a factor to look to full-time work as a solution.

Unless there becomes a standout among this competing software, the situation looks set to continue driving innovation and competitiveness on price. But this will continue to worsen aspects such as collaboration as time goes on.

The design industry needs to develop some kind of solution. Whether that consists of an industry-standard file type, or a means to export designs to other software, is yet to be determined. Until then, freelancers will have to use workarounds and attempt to form some kind of system which allows them to switch between software and format dependent on client, company, and collaborators.

Add Realistic Chalk and Sketch Lettering Effects with Sketch’it – only $5!

Source

from Webdesigner Depot https://www.webdesignerdepot.com/2018/04/from-fireworks-to-framer-is-software-choice-good-for-design/

Wednesday 25 April 2018

A Beginner’s Guide to Video SEO

The popularity of video content has increased dramatically over the last few years and it’s easy to see why; videos are engaging for all age groups which also makes them an important marketing tool.

Businesses have developed dedicated video marketing strategies which generate more leads and boost sales. Video content is also being used by these same businesses to build a better brand experience and stand out from rest of the competition.

And while it’s entirely possible to create high-quality video content and share it through platforms like YouTube, there’s no guarantee that your video will get noticed by the masses. Why? There’s an enormous amount of video content being uploaded to the Internet every day.

In this post, we’ll step through five ways you can optimize your videos for search engines. By the time you’re done reading through this post, you’ll have a clear understanding of how you can implement video SEO techniques to improve your search rankings and reach a bigger audience.

Before we begin, let’s quickly take a look at the basics of video SEO and why it’s important.

What You Need to Know About Video SEO

The fact of the matter is that most consumers search the web when making purchase decisions. So, if you want to take advantage of video marketing, your videos should be optimized for search engines. Video Search Engine Optimization (video SEO) techniques are used by successful video content creators to improve their search engine rankings and increase visibility in search engine results pages.

Nowadays, it’s pretty common to see people consuming video content on their phones at sports events, walking around campus, doing chores around the house, and during their daily commute. Why is that so?

According to Cisco:

  • Every second, a million minutes of video content will cross the network by 2021.
  • Globally, IP video traffic will be 82 percent of all consumer Internet traffic by 2021, up from 73 percent in 2016.
  • It would take an individual more than 5 million years to watch the amount of video that will cross global IP networks each month in 2021.

Think about it for a minute. That is an estimate of enormous proportions. You might be thinking What has this got to do with video SEO? Well, SEO itself is just one important component of digital marketing. The other crucial element is converting your video content traffic into paying customers. Videos can be the perfect tool to help you do just that.

If you want to take advantage of video marketing, your videos have to be optimized for search. Here is how you can drive more traffic to your video content and make your video search results more visible while generating quality leads.

5 Ways You Can Optimize Videos for Search Engines

Over the years, there has been a considerable increase in the usage and popularity of video. They help explain complex topics in a simple way and they play an integral role in increasing conversion rates. Your decision to adopt video as your go-to digital marketing tool is going pay you serious dividends—assuming you optimize your video content for search.

It’s pretty easy to see that video is gaining momentum. Let’s step through some of the different ways you can use video SEO to stay ahead of your competition.

1. Search for Video SEO Keywords

You’ve probably noticed that Google has been displaying more and more videos in search results—a huge chunk of it coming from, to no one’s surprise, YouTube. Video publishing sites like YouTube and Vimeo are huge sources of traffic that receive higher click-through rates than plain text results.

Keywords are responsible for search results displayed on two of the largest search engines on internet—Google and YouTube. For this reason, if you want your video to be successful, you’ll have to use keywords. But how do you find keywords?

If, for instance, you’re in the web design niche, you could start out by running Google searches on terms like web design tutorials or web design tips and tricks.

Now that you have a good keyword to start out with, the next step is to check its search volume. We recommend using the Google Keyword Planner for this. Keywords that get anywhere from 1,000 to 10,000 monthly searches and have low to medium competition are generally good to use.

2. Optimize Metadata: Tags, Filenames, and Descriptions

Tags are keywords assigned to videos. Think of them as the set of words that sum up what your video’s content is about. For those of you who don’t already know, tags, filenames, and descriptions play an integral role in video SEO.

Since you already have a keyword picked out, go ahead and use that in your video’s tags. This is the tag that you want to focus on and optimize your video for. Remember, you can (and should) use more than one tag as long as it’s relevant to your video’s content.

YouTube gives you 5,000 characters worth of description text that you can use to describe what your video is about. And if you’re not using those 5,000 characters to gain some SEO advantage then you’re missing out. Best practices indicate that you should use your keyword (the same one you used as your primary tag) a few times in your video’s description.

Finally, make sure you save your video with your primary keyword as its filename because there are a number of third-party tools on the web that crawl through and factor in video filenames even if Google and YouTube don’t. So, instead of saving the original video file as vid1.mp4 or youtube-vid.mp4, use your primary keyword in its filename. For example, we’d save the video as web-design-tips-and-tricks.mp4.

3. Add a Video Transcript

Video transcripts are a complete textual representation of the content spoken in the video. Metadata and video tags do not offer as much detail of your video’s content to search engines as transcriptions do. Search engine bots crawl text and use it for indexing. So, a video transcript helps search engines better understand the video’s content and improve its ranking.

Follow these steps to transcribe your own video files on YouTube:

  • Your transcription file should be saved as a plain text file i.e. .txt.
  • Using special characters can disrupt speech recognition matching and readability of the transcript.
  • A double line break should be used to signal long pause or new sentence.
  • Add >> at the start of the new line to identify speakers or change of speaker.
  • Insert a link to your website in the audio transcript at the end of the video.

Taking this DIY approach to transcribing your video content will help you deliver more value to your viewership by improving their user experience and it’ll give you the opportunity to use the primary keyword you’re targeting for, a few more times.

4. Publish One Video to One Page

Give each video its own dedicated page on your website instead of publishing multiple videos to a single page. Google gives preference to the first video it finds on a web page and ignores any other video content it finds on the same page. To work your way around Google’s video ranking preference, organize your web pages in a way so that there’s a single video on a page (or post).

You might also be tempted to publish the same video to different web pages on your site to increase its visibility; for instance, if your video is about web design tips and tricks then you might want to publish it in a blog post that you wrote about web designs tips, and you might also want to show it to visitors who land on your Projects page to showcase your ability; this is a strict no-no.

What this does is that it creates internal competition on your website for each instance of the video that you’ve published. Think of it this way, when someone searches for web design tips and tricks on Google, Google’s algorithm has to decide which page to display in its search results. And if all of your videos views are split among three different web pages, your chances of showing up in the search results will be pretty low. However, if you had published it on a single page, and that page was racking up all the views, comments, and impressions, then you’d have a better chance of showing up in search results.

5. Create a Video Sitemap

Video sitemaps provide search engines with metadata about video content on a website and are an extension to your website’s existing sitemap.

You can use the sitemap to tell search engines about the category, title, description, length, and target audience for each video you embed on your website. In addition to this, you can also use it to give search engines more information about your video e.g. play page URL, expiration date, restrictions, and platform.

If your web page has a video on it then it’s sitemap may look something like this:

Conclusion

Video content is gaining momentum.

There are a number of different ways that you can use video SEO tips to increase your video’s visibility, improve its ranking, and show up in search engine results pages. We showed you some of the ways you can get started with video SEO on your own website and, hopefully, you’re in a good position to take things further.

Add Realistic Chalk and Sketch Lettering Effects with Sketch’it – only $5!

Source

from Webdesigner Depot https://www.webdesignerdepot.com/2018/04/a-beginners-guide-to-video-seo/